Monday, November 7, 2011

Cornrows

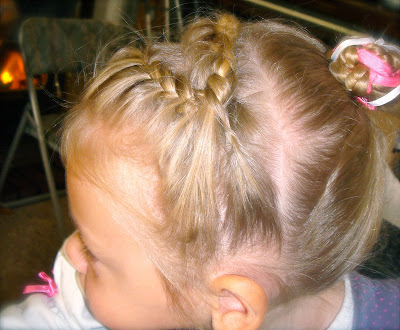
I've always been curious about cornrows. So I decided one day to try it. I know some Mommy's hate the idea of cornrows thinking it's torture on the child, but I didn't notice her acting any different from other days I've done her hair. And believe me, my two year old tells me if something hurts!


It was actually really fun to do. Of course Mine aren't as small as some cornrows, but I wanted something quicker so I just did a little bit bigger ones. There are two on each side of her part. And with the hair by her ears, I was going to cornrow as well, but just ended up twisting them because I had taken too long, and my toddler's patience only lasts so long!


The cornrows themselves were pretty simple. They were just a small french braid. Each section I did I sectioned the hairs out that I wanted and pulled the rest into a pony tail, so the hair wouldn't get mixed in with the other hair. 


Once all the cornrows were done, I brought the braids into a big four strand braid. The two side twists are just secured with a rubber band under the four strand braid and it all comes together in a pony tail, which I made a bun with. I love doing these types of hairstyles where I can get creative with how to bring it all together. 


Anyway this was a fun one!


Friday, November 4, 2011

Lovin' Side Braids!

I'm not sure what to call them, side swept braids? On this tutorial they are called Wrap-Around French Braids. Either way, I love braids that start at the back of the head, ending at the other side. I've tried it with a french twist braid as well, but I like this new way better because it is more secure.


What's is fun about this french braid is that you don't take hair for the top strand (like in a normal french braid where you take hair for the top and bottom), only take hair for the bottom strands when you include the new hair in. This makes the braid pop out more. 


Alright, so it doesn't look as clean as the one in the tutorial so I think it might work better next time if I straightened her hair. See my toddler's hair is very wavy with some crazy cowlicks in the back so I can never get it to lay down straight. But, I'm willing to overlook that if you are because it is such a fun hairstyle!


Tuesday, November 1, 2011

Halloween Time!

I was so excited for Halloween (mainly for the candy!) but I was also excited to curl her hair. If only she could have Shirly Temple ringlets everyday. They were adorable, but a lot of work. Did I mention a lot of work? 


Geesh it took me like two hours to curl all that hair. And because I don't plan well I didn't have time to dress up, like I was hoping! Oh well maybe next year. I just love when I have an excuse to dress up :( So anyways, the little guy ended up as the wolf (for little red riding hood).   


My Mom actually made me this hood when I was in Kindergarden, so I thought it would be special for Sage to wear. It was perfect!


It was a fun Halloween with good memories. I want to make a tradition of having cinnamon rolls when we get back from trick or treating. We had pumpkin cinnamon rolls and sugar free pumpkin cake with orange glaze. Yummy! 


Friday, October 28, 2011

Cute While It Lasted

This is not really a toddler hairstyle. I was just playing with her hair and ended up with this. And yes it  only lasted a few minutes before taking it out and putting tight pony tails in but it was cute while it lasted. (run on sentence?) Anyway she's been sick so I haven't done much of anything with her hair lately. 


Is that all the excitement you can handle? Haha because I promise there will be more interesting ones coming up. Especially with Halloween this weekend! I'm excited for that. So Stay Tuned for Little Red Riding Hood and the Small Bad Wolf!


Wednesday, October 26, 2011

Dutch Braids

So much for posting every day. It's not easy sometimes. But that means that I can put a bunch of pictures in one post, like I'm going to do here. Now I've always wanted to try a Dutch crown braid like in the tutorial here. I didn't think that Sage's hair was long enough to do the Dutch crown braid all the way around her head so I first tried it like this.


I just started at one ear and did a Dutch braid and when I got to the other end I just kept braiding to the end of the hair without pulling any new hair in and I tied it with an elastic. Then I started the braid again going from right to left incorporating the first braid in. That is why the second row looks thicker. I was so happy with it and it even lasted for a few days :) That is always a plus.


Anyway enough of that one. I was just so excited to learn to do it. I tried it again a few days later when we were going to a football game. I wanted my daughter's hair to be down so she would be warmer, but she can't just simply wear it down because it gets all in her face. So, I thought it would be fun to do a small dutch braid in the front to keep the hair out of her face. 


Next, I decided to get fancy and try a real braided crown. See, on bath days I get so excited to do Sage's hair because it's wet, which makes it much easier to do sometimes. 


So, I found out that her hair is barely long enough. See you start at one end and add hair in from the bottom only until you get to the other side. Then you have to tuck the end of the braid into the other side to make it look like one continuous braid. So it needs to be long enough to make it to the other side.


I think I would do these everyday if my daughter let me. Some days, I have to do much quicker hairstyles like a very messy pony tail to keep it out of her face. And those days do not make their way to this blog ;)

Thursday, October 20, 2011

Neon Green Rubber Bands!

I wish that I had tried Rubber Band hairstyles earlier, because they're incredibly easy (which is important!) They end up being very pretty and take a minimal amount of time to do. Here's the first one I ever tried. 


I got the steps of how to do this here. It's actually pretty simple. Once to do it once, you pretty much get the hang of it. 


I know, the rubber bands don't match her outfit. Never use bright green elastic bands unless you have something to match them! Ahh well I went and bought clear elastic band right after this to fix that problem. I used them in the next rubber band hairstyle I did on her. 


I don't know exactly what I did, but it was fun to do something original. I started with 3 ponytails twisted  on each side in the front. Somehow I connected them and ended up with four rubber bands at the end and did a four strand braid, then tied them, then put the flower, then pulled up the rest of the hair in a low pony tail. I actually did a twist braid with the low pony tail, but it got pretty loose because I don't use product in her hair but I just left it! Anyways I had a fun time creating this one!


And the new clear elastic rubber bands were perfect because then she could wear the ponies the next day as well, and it doesn't matter what color her outfit is (this was a 2 day hairstyle :) They were much better then neon green :)


Wednesday, October 19, 2011

Fishtail Piggies

This was a really cute hairstyle. I still have yet to do a sideswept fishtail, kind of like I did my french twist braid. I think it would be really pretty that way and it would probably be much easier then doing pigtails. 


These have a wispy little girl pretty look. They are not as firm as a french braid, but very pretty still.

I really like how the next one turned out. I did just one fishtail french and it turned out very pretty. All you do it quickly separate the whole hair into two sections and bring a piece from one side to the opposite section in the back and then bring a piece from the other front side to the opposite section in the back. Now Sage's hair isn't quite long enough for her front pieces to stay in so when I brought the front pieces over to the opposite side I tied it with a clear elastic to a small section of hair to keep it in place. You then continue to do a fishtail braid over top of it to cover the elastic. I just did this three or four times for the front sections to stay in easier and then just did the rest as a regular fishtail. I got this technique here from this video


This would be a beautiful hairstyle on an adult. You could stop braiding at the base of the head and just put it in a low messy bun instead of fishtail braiding all the way to the end or even put it into a simple pony tail at the base of the head. I've tried it on myself, but I didn't use bobby pins or an elastic hair thing to keep the front ends in place so it was a little loose (I don't do pictures of myself ;) 


Tuesday, October 18, 2011

The Happy Boy

I'm sure my little guy feels very left out of this blog so here's my tribute to the happy boy. I just love that face. What is nice about boys, is you don't need to do their hair! I have already had to give him a haircut though (I love cutting hair off!) But with my little girl, I have a harder time fathoming cutting off her hair. Which....is why I haven't cut her hair yet.  

7 Months now!
Anyways, This may be a common hairstyle when Sage is older because it's really not much of a hairstyle ;) I straightened her hair (very quickly!) one day. I liked it because I could actually see how long her hair is. When it is all wavy and curly it's hard to tell. 


She looks too old in this picture to me :(


Monday, October 17, 2011

A Bunch!


I really want to just get caught up on all of my older hairstyles so I can be posting current ones each day. So here are a handful of them, each very different. 


This one was fun. I just parted it down the middle and took one side and tied it like beginning of tying a shoe (before you make the bow) and then did it again, making a knot, each time gathering more hair. The thing I like most about it is that it looks like it took some work, but it is sooooo easy. I mean extremely easy! Much easier then braiding. 

Another one that looks like it took some braiding is this. 

This is a common face these days!


I got the idea for this hairstyle at Princess Hairstyles. I know, it looks different then the one on that site. I used a much smaller ribbon and I pulled mine into pigtails. I was so proud of myself though. I've always wanted to use ribbon in braids and whatnot, but it seems too hard. This was fairly easy. 

The next one is neither great or exciting, but I loved it on Sage. Her hair is so curly and wavy and it was nice to just let her waves go (normally it drives me crazy and I want her hair up nice and neat) but this time I made myself do it haha.


She was so happy when I was done!